Operation technique
SpineShape System IV
System IV is an implant system, which relies on the pedicular fixation. The pedicular fixation (introduced by Prof. Raymond Roy-Camille in the 1960ties) nowadays belongs to the standard procedures in the spine surgery.
In this operative-technique only those steps are mentioned, which specifically refer to the System IV. Regarding the approaches, two widely spread standard techniques are known, namely the medial and the lateral approach. The medial approach is normally used when the spinal canal must be simultaneously opened, e.g. for treating a disc prolapse. The lateral approaches (acc. to Wiltse) are in so far advantageous as the pedicles can be accessed along their lateral axis and that muscular scars are thus minimized.
System IV is basically suitable for the entire lumbar spine, i.e. from L1 to S1 (sacrum). For patients with small vertebral bodies it should previously be verified whether the upper vertebrae (e.g. L2, L1) allow accommodation of the provided pedicle screws and connection rods.
In a nutshell
Selection
Selection guide for the correct rod flexibility
- A low-flex rod shall be used when a patient requires a high degree of stabilisation, where a later spontaneous fusion would be desirable.
- A mid-flex rod shall be used when a patient requires a medium degree of stabilisation, e.g. after a decompression surgery with a light iatrogenic destabilisation.
- An high-flex rod shall be used when a patient requires a low degree of stabilization, e.g. to protect the nerve roots, to limit motion on the facet joints or to avoid disc bulging. The high-flex rod has control tasks rather than load carrying tasks.
Note: The flexibility also varies with the distance between the pedicle screws. The further apart the screws, the more flexibility is achieved.
Available rods

| Flexibility | Standard | Varistab™ |
|---|---|---|
| high-flex | 21.012.21-200 | – |
| mid-flex | 21.012.23-200 | 21.015.23-200 |
| low-flex | 21.012.25-200 | 21.015.25-200 |

For the low-flex and mid-flex rod, as an option, a version with a stepped cross section (called Varistab™) is available, which serves to connect and protect the adjacent segment with double (axial) flexibility. The same pedicle screws can be used for the stepped region; only the length of the clamp screw needs to be different. For the standard rod (prismatic) the short clamp screw (Art.-Nr. 21.019.11-000-S) is used and for the Varistab™ (stepped) the long clamp screw (Art.-Nr. 21.019.11-100-V) is used.
Indications

*) hypermobility with antelisthesis / hypomobility with retrolisthesis when decompressed
**) treatment with SpineShape feasible but not preferred
Placement
Placement of pedicle screws

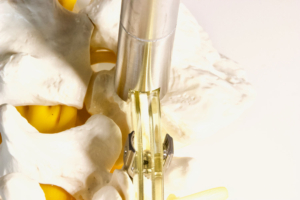
After determining the diameter and the length, the screw is being screwed on the pedicle screw setter with holding sleeve (20.001.00-02) and screwed into the pedicle with the snap-on universal ratchet (20.013.00) or T-handle ratchet (20.013.01). The pedicle screw shall be only put in to a degree where the rod may be passed unhindered along the facet joints. The pedicle screws shall be oriented towards their neighbour screw according to the direction of rod insertion (from top down or bottom up).
Measuring and cutting the rod
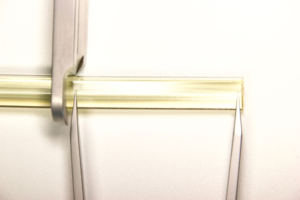
The rod is cut to the desired length using the rod cutting instrument (20.009.00).
After a first positioning of the vertebrae in the desired position the length of the rod must be determined in a way that its length exceeds the heads of the end screws by one half to one entire flank height. The compass (20.004.00) may be used for this measurement.
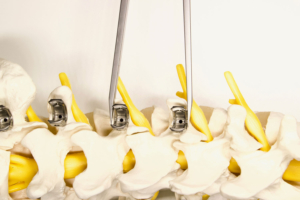
Placement of the rod
The elastic rod can be directly placed into the open screw heads. The mid-flex and low-flex rod must be heated to 60°C in a sterile bath, in order to be easily placed into screw heads which do not lie on one axis. For easy placement right and left rod holding pliers with bent ends (20.006.00 and 20.006.01) are available.
Installing the clamp screw
Option 1
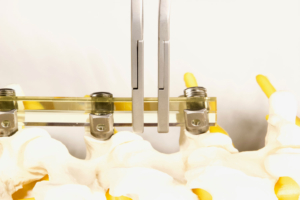
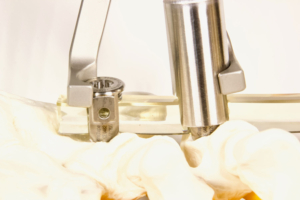
First mount the clamp screw onto the clamp screw setter (20.007.10). Then install the universal instrument (20.006.10) on the pedicle screw head, where the width of the moveable hooks must be limited using the dedicated mechanism to get it automatically centred on the pedicle screw head.
The clamping screw setter is then pushed through the universal instrument to properly insert the clamping screw into the pedicle screw head.
Option 2
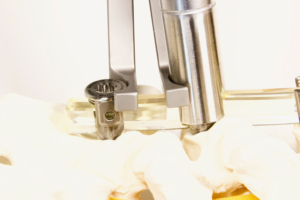
First mount the clamp screw onto the clamp screw setter (20.007.10), as in Option 1. Then install the counter torque sleeve (20.005.10) on the pedicle screw head, adequately aligned to catch its flanges.
The clamp screw setter is then pushed through the counter torque sleeve to properly insert the clamping screw into the pedicle screw head.
Control of the relative endplate position
contraction / lordosing
distraction / cyphosing
Distracting / adding kyphosis
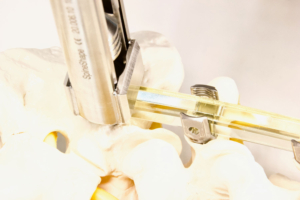
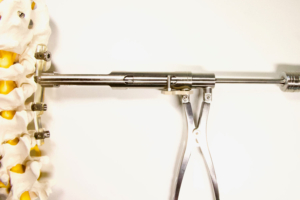
The distracting plier (20.003.10) may be put inside the clamping element securely tightened to its stop and the counter torque sleeve (20.005.10). The distracting plier has a scale with a 2mm spacing.
In case of narrow pedicle screws, in order to gain additional space, one arm of the distraction plier may lean on the clamping screw setter (20.007.10). In this case, extreme care must be exercised not to damage the instrument-/implant-interface.
Contracting / adding lordosis
The contracting plier (20.002.10) may be put outside the nut or clamping element securely tightened to its stop and the nut installer (20.007.00) or counter torque sleeve (20.005.10) for the STD-System or INI-System respective-ly. The contracting plier has a scale with a 2mm spacing.
Tightening clamp screw
The clamping screw is basically tightened using the clamping screw setter (20.007.10). The tightening torque shall only be applied if the screw is properly hold to counteract, in order to prevent the screw from rotating with the rod already installed. If the stop cannot be reached immediately a short break shall be made to let the material settle in place. Two options are available to neutralize the tightening torque, one using the universal instrument and the other using the counter torque sleeve.
Option 1
In easy circumstances and in particular when using an elastic or warmed-up mid-flex or warmed-up low-flex rod, the clamping screw can be counteracted by using the counter torque sleeve (20.005.10).
Option 2
In more demanding circumstances and in particular when using the mid-flex or low-flex rod, which may need slightly more pressure for being positioned fully forward into the pedicle screw head, the clamping screw can be counteracted by using the universal instrument (20.006.10).
Once the clamping screw tightened, the moveable hooks must be opened to their maximum for removing the universal instrument from the pedicle screw head.
The universal instrument has several features: it allows slight rotations of the pedicle screw to properly align with the rod’s path, it pushes the rod forward into place (provided a free room without obstructions by bone or soft tissue), it centres the clamping screw for proper alignment, it counter-torques the pedicle screw while tightening the camping screw.
Rehabilitation
During the first six weeks after surgery the patient should basically avoid uncontrolled rotational and bending movements, particularly with high loads on the vertebral column, in order not to compromise the proper in-growth of the pedicle screws. Movements with heavier loads should only be undertaken after six months.
Crutches are generally not necessary in standard cases, yet walking aids may be advocated for special reasons (e.g. paresis, coordination problems, status after operative hip or knee joint replacement). In case L5/S1 is involved, sitting with flexion of the hips >90° should be prevented by seat wedges, toilet seat elevation, elevated chairs, and adapted bed height.
Proper walking as well as climbing stairs should be demonstrated by a physiotherapist who needs to be informed about the implications of the procedure by the surgeon. In addition, the physiotherapist should also show the patient how to avoid unadvisable movements and give adequate recommendations for daily tasks. If considered necessary by the physicians, breathing exercises can be helpful. The trunk muscles and their proprioception should preferably be trained isometrically without large ROMs and force amplitudes.
After the first three weeks, after complete wound healing, exercises can also be done in water, yet only under close supervision of the physiotherapist. In this period of time limited flexion, lateral bending and rotation exercises may be begun with (max. 30° in every direction).
In the first three weeks while regaining mobility the patient should regularly wear a brace to prevent uncontrolled motion.
After three weeks the patient may begin, first temporarily and then increasingly often, weaning of the brace. The gradual entry into the activities of daily living can now be started.